
Salted Caramel Apple Pie Recipe
So you’re craving apple pie… but not just any apple pie. You want that gooey salted caramel magic, the kind that makes people close their eyes dramatically after the first bite like they’re in a food commercial. Yeah, that pie. Good news: you don’t need pastry chef credentials or a baking reality show meltdown to make it happen. This salted caramel apple pie is cosy, sweet, salty, and just fancy enough to impress—without actually being complicated. Basically, it’s the dessert equivalent of wearing sweatpants that look like designer trousers. Win-win.
Why This Recipe is Awesome
Let me count the ways this pie will upgrade your baking reputation:
- Sweet + salty = flavour jackpot. Caramel and apples were already besties; salt makes them iconic.
- Ridiculously comforting. One slice = instant fall vibes, even if it’s 35°C outside.
- Looks impressive, secretly easy. People assume you slaved for hours. You… did not.
- Crowd-pleaser energy. No one argues with apple pie—especially not caramel-loaded apple pie.
- Flexible AF. Store-bought crust? Homemade? Gluten-free? This pie says, “Come as you are.”
- Honestly, it’s one of those desserts that makes you look like you “have your life together.” Even if you absolutely don’t.
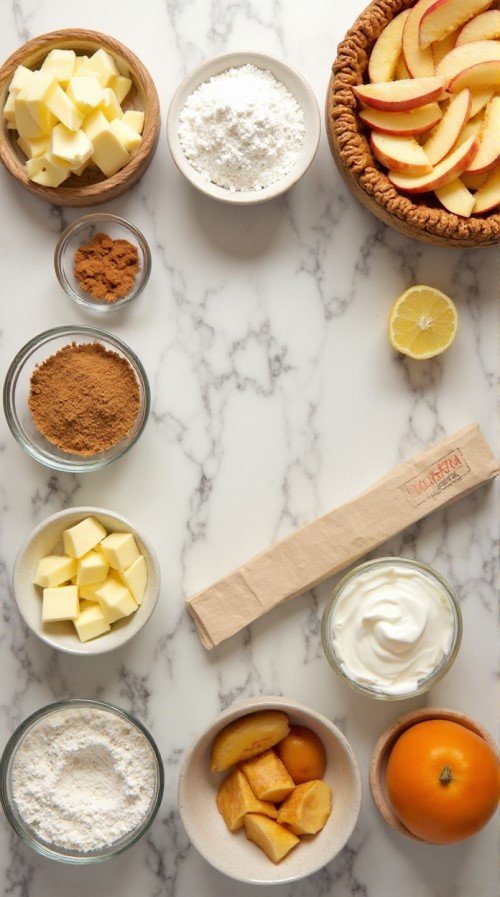
Ingredients You’ll Need
For the “Salted Caramel Apple Pie Recipe”:
- 2 pie crusts (homemade or store-bought — zero judgment here)
- 1 egg (for egg wash, aka shine potion)
- 1 tbsp water
- For the apple filling:
- 6–7 medium apples (Granny Smith + Honeycrisp combo = chef’s kiss)
- ¾ cup granulated sugar
- ¼ cup brown sugar
- 2 tbsp all-purpose flour
- 1 tsp ground cinnamon
- ¼ tsp nutmeg
- ¼ tsp salt
- 1 tbsp lemon juice (keeps apples from going sad and brown)
- For the salted caramel sauce:
- 1 cup granulated sugar
- 6 tbsp butter (cut into cubes)
- ½ cup heavy cream
- 1 tsp sea salt
Optional but fabulous:
- Extra caramel for drizzling
- Flaky sea salt for that bougie finish
Step-by-Step Instructions
To make your “Salted Caramel Apple Pie Recipe”
- Make the caramel first.
Heat sugar in a saucepan over medium heat, stirring constantly. It’ll clump, then melt into amber liquid—don’t panic, that’s normal. Once fully melted, add butter and whisk until smooth. - Add cream carefully.
Slowly pour in heavy cream (it’ll bubble like it’s possessed). Stir until silky. Remove from heat and mix in salt. Let cool slightly. - Prep the apples.
Peel, core, and slice apples about ¼-inch thick. Toss them in a large bowl with sugars, flour, cinnamon, nutmeg, salt, and lemon juice. - Coat with caramel goodness.
Pour about half the salted caramel over the apples. Mix gently so every slice gets glossy and happy. - Assemble the pie.
Place one crust in a pie dish. Add apple mixture, mounding slightly in the centre (they shrink while baking, FYI). Drizzle a little more caramel on top. - Top it off.
Cover with second crust (full, lattice, or decorative—live your truth). Seal edges and cut vents so steam escapes instead of causing pastry drama. - Egg wash magic.
Beat egg with water and brush over crust. This makes it golden and bakery-level pretty. - Bake to glory.
Bake at 200°C (400°F) for 20 minutes, then reduce to 180°C (350°F) and bake 35–40 minutes more. Apples should be tender and crust deep golden. - Cool (the hardest step).
Let pie cool at least 2 hours so filling sets. Cutting early = caramel lava situation. Tasty, but messy. - Serve dramatically.
Slice, drizzle extra caramel, sprinkle flaky salt. Accept compliments gracefully.
Common Mistakes to Avoid
- Skipping the cooling time. Yes, it smells amazing. No, you still have to wait. Structure matters.
- Using only soft apples. They turn to mush. Mix firm + crisp varieties for texture.
- Burning the caramel. If it smells bitter, start over. Burnt sugar = heartbreak.
- Overfilling the pie. Apples shrink; caramel expands. Overflow = oven mess.
- Forgetting vents. Steam needs an exit. Otherwise, crust bubbles like a pastry volcano.
- Alternatives & Substitutions
- No homemade caramel mood? Store-bought salted caramel works fine. IMO, homemade tastes deeper, but convenience wins sometimes.
- Gluten-free? Use GF pie crust and swap flour for corn-starch.
- Dairy-free? Coconut cream + vegan butter make solid caramel. Slight coconut note, but honestly kind of amazing.
- Less sweet preference? Reduce sugar in filling by 2–3 tbsp. Apples still shine.
- Spice it up. Add cloves or cardamom for extra warmth. Fancy bakery vibes unlocked.
FAQ (Frequently Asked Questions)
Can I use all one type of apple?
Sure—but mixing tart and sweet apples gives better flavour balance. One-variety pies taste flatter.
Do I really need to peel the apples?
Technically no… but the texture gets weird and chewy. Peeling = smoother filling. Worth it.
Can I make this pie ahead of time?
Absolutely. Bake a day ahead and store covered at room temp. Reheat slices briefly for gooey revival.
Why is my caramel grainy?
Sugar crystallized—usually from stirring too aggressively or impurities. Gentle heat and patience fix this next time.
Can I freeze salted caramel apple pie?
Yes! Freeze baked pie up to 3 months. Thaw overnight and warm in oven. Still delicious.
What if my crust browns too fast?
Tent edges with foil halfway through baking. Problem solved, crust saved.
You Should Try Our Best :
Dark Chocolate Cherry Muffins Recipe
Final Thoughts About :
“Salted Caramel Apple Pie Recipe”
Salted caramel apple pie is one of those desserts that feels nostalgic and luxurious at the same time—like grandma met a gourmet pastry chef and they collaborated. It’s cosy, dramatic, and unapologetically indulgent, which IMO is exactly what dessert should be.
So go ahead: roll out that crust, stir that caramel, and make your kitchen smell like a fall candle’s dream. Then slice yourself a generous piece, add extra drizzle (because obviously), and enjoy the moment.
Now go impress someone—or yourself—with your new pie-baking superpower. You’ve earned it. 🥧✨

Salted Caramel Apple Pie Recipe
Ingredients
Method
- Prepare salted caramel by melting 200 g sugar until amber then whisking in butter, cream, and sea salt until smooth.
- Toss sliced apples with granulated sugar, brown sugar, flour, cinnamon, nutmeg, salt, and lemon juice until evenly coated.
- Mix apples with half of the salted caramel sauce until glossy.
- Place bottom pie crust into pie dish and fill with caramel apple mixture.
- Drizzle remaining caramel over filling and cover with top crust.
- Seal edges, trim excess dough, and cut steam vents in the top crust.
- Whisk egg with water and brush evenly over crust surface.
- Bake at 200°C for 20 minutes then reduce to 180°C and bake 35–40 minutes until crust is deep golden and filling bubbles.
- Cool pie completely for at least 2 hours before slicing and serving.
Notes
If crust browns too quickly cover edges loosely with foil.
Cooling fully allows caramel filling to set neatly when sliced.
Store covered at room temperature for 1 day or refrigerate up to 4 days.
Warm slices slightly before serving for gooey caramel texture.
DID YOU MAKE THIS EASY RECIPE?
If you have, then share it with us by sending a photo. We’re excited to see what you’ve made.


