
Biscoff Cookie Butter Truffles Recipe
So, you’re craving something ridiculously sweet and dangerously easy, huh? Well, stop right there—these Biscoff Cookie Butter Truffles are about to become your new obsession. Seriously, one bite and your taste buds will send you a thank-you note. And the best part? You barely have to move a muscle to make them. Lazy bakers, rejoice!
Why This Recipe is Awesome
Let’s be honest: not all desserts are created equal. Some require a small army of ingredients, a PhD in baking, and patience you definitely don’t have. But these truffles? They’re idiot-proof. I mean it—even I didn’t mess them up, and I once tried to cook pasta without water.
Here’s what makes them awesome:
- No fancy equipment needed. Just a bowl, a spoon, and maybe some chocolate-loving hands.
- Quick to whip up. 20 minutes? Max. Chill time excluded—but hey, Netflix is allowed during that.
- Versatile AF. Roll them in cocoa, nuts, or crushed cookies. Your call.
- Guaranteed to impress. Friends, family, or your cat (who cares?) will be impressed.
Ingredients You’ll Need
Grab these simple ingredients before your cravings get the better of you:
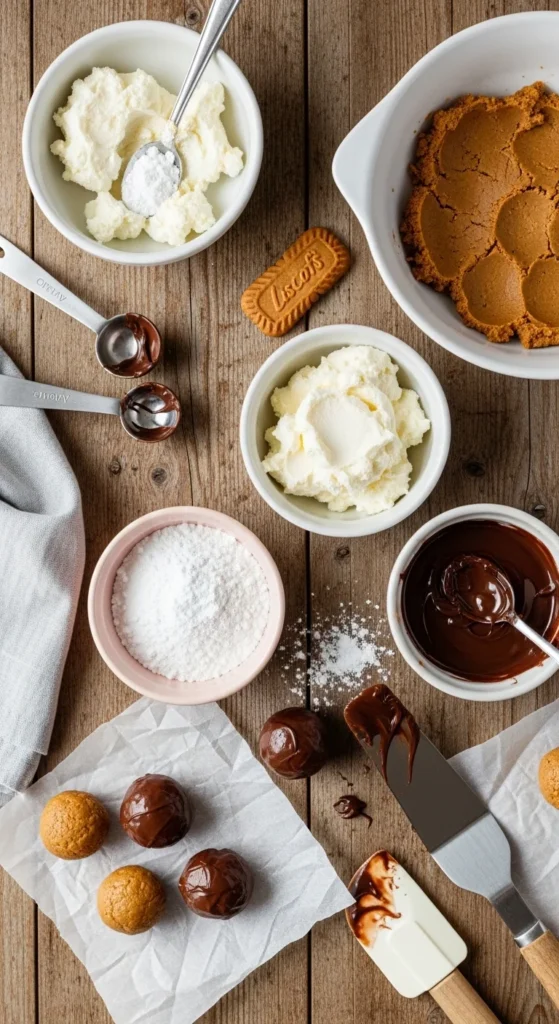
- 1 cup Biscoff cookie butter – the star of the show, duh.
- 8 oz cream cheese, softened – adds that silky, dreamy texture.
- 2 cups powdered sugar – sweetness overload incoming.
- 12 oz milk or dark chocolate, for coating – pick your favorite, no judgment.
Optional toppings: crushed Biscoff cookies, chopped nuts, or sprinkles – because why not go extra?
Step-by-Step Instructions
- Mix the magic. In a large bowl, combine Biscoff cookie butter and softened cream cheese until smooth. Don’t worry if it looks like a sticky mess—this is normal.
- Sweeten it up. Gradually add powdered sugar, mixing well after each addition. You’re aiming for a firm yet pliable dough. Taste test? Absolutely. You deserve it.
- Chill out. Cover the mixture and pop it in the fridge for at least 30 minutes. This makes rolling the truffles much easier—trust me, your hands will thank you.
- Shape them. Scoop small amounts (about a tablespoon each) and roll into balls.
Pro tip: Slightly damp hands prevent stickiness. - Melt the chocolate. Use a microwave or double boiler. Stir until smooth and shiny. Drooling yet? Same.
- Coat the truffles. Dip each ball into the melted chocolate and place on parchment paper. Top with your optional crushed cookies or sprinkles before the chocolate sets.
- Chill again. Pop the tray in the fridge for another 15–20 minutes to let everything firm up. Then… enjoy your creation!
Common Mistakes to Avoid
- Skipping the chill step. Rookie mistake. You’ll regret sticky fingers forever.
- Overmixing the dough. Chill out, literally. Overmixing can make it too soft.
- Microwaving chocolate like a savage. Burnt chocolate = sad truffles. Stir often.
- Rolling too big. Bite-sized is key. Nobody wants a dessert that needs a knife and fork.
Alternatives & Substitutions
- Cream cheese swap: Try mascarpone for a slightly richer, less tangy flavor.
- Chocolate freedom: White chocolate, dark chocolate, or even peanut butter coating—get creative.
- Sugar tweak: Reduce powdered sugar by 1/4 cup if you’re sensitive to sugar highs.
- Nutty twist: Roll truffles in crushed almonds or hazelnuts instead of cookie crumbs for crunch.
You can also try this lovely Recipe: Peanut Butter Banana Bites Recipe
FAQ (Frequently Asked Questions)
Can I make these vegan?
Totally! Use vegan cream cheese and plant-based chocolate. Your sweet tooth stays happy, conscience stays clear.
How long do these truffles last?
Stored in an airtight container in the fridge, they’ll last up to a week—though they rarely survive that long.
Can I freeze them?
Yes! Freeze uncoated truffles for up to a month. Coat in chocolate after thawing for the best results.
Can I use peanut butter instead of Biscoff?
You could, but why ruin perfection? Peanut butter fans, go wild if you dare.
Do I need a fancy cookie butter brand?
Nah. Any Biscoff or speculoos spread works. Just skip the off-brand mystery spreads—your taste buds deserve respect.
Why are my truffles grainy?
Probably powdered sugar clumps. Sift it first or mix thoroughly to avoid sandy bites.
Final Thoughts
And there you have it! Biscoff Cookie Butter Truffles that are ridiculously easy, insanely tasty, and perfect for impressing literally anyone. Now go roll, dip, and devour. Or gift them… but let’s be honest, you’ll probably eat most yourself.
Remember: baking isn’t about perfection—it’s about fun, flavor, and that smug little grin when you realize you just made something amazing with almost zero effort. Enjoy every bite, you genius baker, you!

Biscoff Cookie Butter Truffles Recipe
Ingredients
Method
- Mix cookie butter, crushed cookies, powdered sugar, and vanilla extract in a bowl until combined.
- Roll the mixture into small balls using your hands.
- Place truffles on a parchment-lined tray and chill in the fridge for 30 minutes.
- Dip chilled truffles into melted chocolate and place back on the tray.
- Decorate with sprinkles or crushed cookies if desired.
- Chill again until chocolate is set, then serve.
Notes
Chill truffles before coating for best results.
Store in an airtight container in the fridge for up to 1 week.
Adjust powdered sugar for the sweetness preference.
Perfect for making ahead of time for parties or gifts.


