
Grandma Dessert Recipe
So you want dessert… but you also want something that feels like a warm hug from your childhood kitchen? Same here. Nothing beats the kind of sweet treat that smells amazing while baking and magically makes the whole house feel cosy.
That’s where this Grandma Dessert Recipe comes in. It’s simple, comforting, and dangerously delicious. The kind of dessert that makes people say, “Wait… who made this?!” after the first bite.
And the best part? You don’t need chef skills, fancy gadgets, or ingredients that sound like they belong in a science lab. Just a few pantry staples, a little mixing, and suddenly your kitchen smells like pure happiness.
Why This Recipe is Awesome
Let’s be honest: some recipes claim they’re “easy,” but secretly require 18 ingredients and the patience of a saint.
This one? Not even close.
Here’s why this Grandma Dessert Recipe is a total winner:
- It’s ridiculously easy. If you can stir ingredients in a bowl, you’re already qualified.
- Minimal ingredients. No weird specialty items—just everyday stuff.
- Cosy comfort vibes. One bite and suddenly everything feels better.
- Perfect for any occasion. Family dinners, potlucks, or midnight snack attacks.
- Almost impossible to mess up. Seriously, even distracted bakers can nail this.
IMO, the best recipes are the ones that taste amazing without destroying your kitchen in the process.
Ingredients You’ll Need
Here’s everything needed to create this cosy dessert masterpiece:
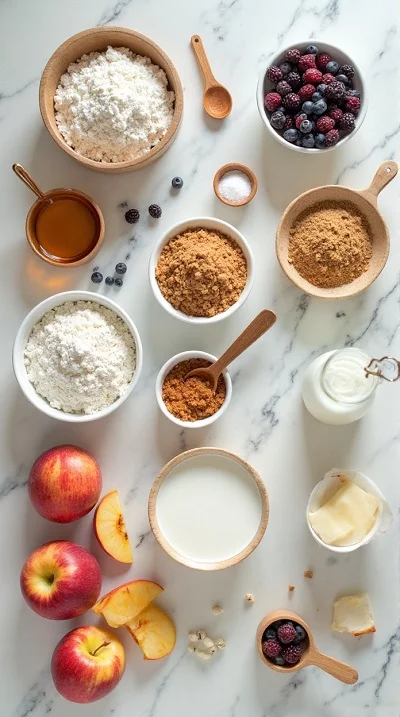
- 2 cups all-purpose flour – the backbone of our dessert
- 1 cup granulated sugar – because life needs sweetness
- ½ cup unsalted butter (melted) – rich flavour magic
- 2 large eggs – they hold everything together
- 1 cup milk – keeps the texture soft and tender
- 1 tsp vanilla extract – small ingredient, huge flavour
- 1 tsp baking powder – the fluff maker
- ½ tsp salt – balances the sweetness
- 1 cup mixed fruit (berries, apples, or peaches) – choose your favourite
- ½ cup brown sugar – for the cosy caramel topping
- 1 tsp cinnamon – the warm hug of spices
- Powdered sugar (optional) – for that bakery-style finish
Quick tip: Fresh fruit is fantastic, but frozen fruit works perfectly too. Grandma loved smart shortcuts.
Step-by-Step Instructions
1.Preheat the oven First things first: set your oven to 350°F (175°C). Yes, this step matters. Skipping it leads to sad, uneven baking.
2.Mix the dry ingredients Grab a medium bowl and combine:
- Flour
- Baking powder
- Salt
Whisk everything together until evenly mixed. Nothing complicated here.
3. Combine the wet ingredients
In another bowl, whisk together:
- Sugar
- Eggs
- Melted butter
- Milk
- Vanilla extract
Mix until smooth and creamy. The smell alone will already make you excited.
4. Bring everything together Slowly add the dry ingredients into the wet mixture. Stir gently until just combined. Don’t overmix. A few small lumps are completely fine.
5. Add the fruit Fold your fruit into the batter.
- Blueberries?
- Perfect. Apples?
- Delicious. Peaches?
Even better.
Spread the batter evenly into a greased baking dish.
6. Make the topping
In a small bowl combine:
- Brown sugar
- Cinnamon
- Sprinkle this mixture over the batter.
This step creates the magical caramelized top layer.
7. Bake the dessert Place the dish in the oven and bake for 35–40 minutes.
You’ll know it’s ready when:
- The top looks golden
- Your kitchen smells incredible
- A toothpick comes out mostly clean
Let it cool slightly before serving, then dust with powdered sugar if you’re feeling fancy.
Common Mistakes to Avoid
Even easy recipes have a few traps. Let’s avoid them.
- Skipping oven preheating
Thinking the oven will magically catch up later? Rookie mistake. - Overmixing the batter
Too much mixing makes the dessert dense instead of fluffy. - Using too much fruit
Tempting, I know. But too much fruit makes the dessert soggy. - Cutting it immediately
Fresh baked desserts are basically molten lava. Let it cool for 10–15 minutes.
Alternatives & Substitutions
Missing an ingredient? No problem.
- No butter?
Use melted coconut oil or vegetable oil instead. - No milk?
Almond milk, oat milk, or soy milk all work well. - Want a gluten-free version?
Use a 1:1 gluten-free flour blend. - Craving extra flavour?
Add lemon zest or a pinch of nutmeg. - Feeling indulgent?
Toss in chocolate chips. Because honestly… why not?
FYI, grandma-style recipes are usually flexible. That’s part of the charm.
You Should Try Our Best Low Fat Dessert Ideas Recipe
FAQ (Frequently Asked Questions)
Can I make this Grandma Dessert Recipe ahead of time?
Absolutely. Bake it earlier in the day and warm it slightly before serving. The flavours actually get better after resting.
Can I freeze it?
Yes! Wrap slices tightly and freeze for up to two months. Just thaw and warm before serving.
Can I use canned fruit?
Sure, but drain it well first. Otherwise you’ll accidentally create dessert soup.
Do I really need the cinnamon topping?
Technically no… but emotionally yes. The cinnamon sugar creates that delicious caramelized top.
Can I reduce the sugar?
Of course. You can cut about ¼ cup of sugar and the dessert will still taste great.
What fruit works best for this recipe?
Berries, apples, peaches, or cherries are fantastic. Honestly, whatever fruit you love most will probably work perfectly.
Final Thoughts
And there you have it—an easy, comforting Grandma Dessert Recipe that delivers big flavour with minimal effort.
It’s the kind of dessert that feels homemade in the best possible way. Nothing fancy, nothing complicated—just warm, sweet goodness straight from the oven.
Bake it for family.
Bake it for friends.
Or bake it for yourself while watching your favourite show in panamas.
No judgment here.
Pro tip: Serve it warm with vanilla ice cream and suddenly everyone thinks you’re a baking genius.
Now go impress someone—or just treat yourself. You’ve definitely earned it. 🍰

Grandma Dessert Recipe
Ingredients
Method
- Preheat the oven to 175°C (350°F) and grease a medium baking dish.
- In a bowl, whisk together flour, baking powder, and salt until evenly combined.
- In another bowl, mix sugar, eggs, melted butter, milk, and vanilla extract until smooth.
- Gradually add the dry ingredients into the wet mixture and stir gently until just combined.
- Fold in the mixed fruit and spread the batter evenly into the prepared baking dish.
- Mix brown sugar and cinnamon together in a small bowl.
- Sprinkle the cinnamon sugar mixture evenly over the batter.
- Bake for 35–40 minutes until golden on top and a toothpick inserted comes out clean.
- Allow the dessert to cool for 10–15 minutes before serving.
- Dust lightly with powdered sugar if desired and serve warm.
Notes
Avoid overmixing the batter to keep the dessert soft and fluffy.
Let the dessert cool slightly before cutting to help it set properly.
Serve warm with vanilla ice cream for an extra comforting treat.
If you have, then share it with us by sending a photo. We’re excited to see what you’ve made.


