
No Bake Desserts Recipe
So you want dessert… but turning on the oven feels like a personal attack? Yeah, same. Some days you crave something sweet, creamy, and ridiculously satisfying without sweating in the kitchen like you’re auditioning for a cooking show. That’s exactly where no bake desserts come to the rescue — minimal effort, maximum happiness.
Whether you’re dodging summer heat, short on time, or just feeling a little lazy (no judgment here), this No Bake Desserts Recipe is about to become your new best friend. Grab a bowl, maybe a spoon you’ll secretly lick later, and let’s make magic happen.
Why This Recipe is Awesome
Let’s be honest — recipes that require zero baking already deserve a standing ovation.
Here’s why this one wins:
- No oven required. Your electricity bill says thank you.
- Beginner-friendly. If you can stir, you can make this.
- Fast results. Dessert today, not tomorrow.
- Customizable. Chocolate lover? Fruity fan? Chaos baker? All welcome.
- Almost impossible to mess up. Seriously, even distracted multitaskers survive this recipe.
Plus, chilling desserts somehow makes them taste fancier. It’s science. Probably.
Ingredients You’ll Need
Simple ingredients. Nothing dramatic. No mysterious chef-only items.
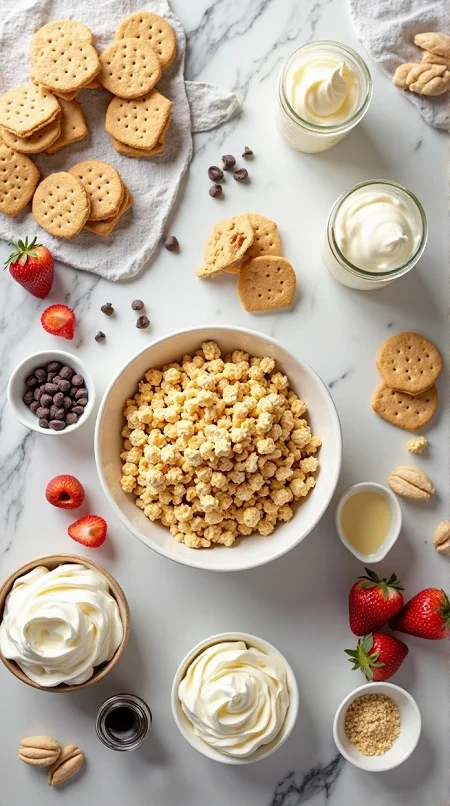
- 2 cups crushed digestive biscuits or graham crackers (aka dessert foundation)
- 1 cup heavy whipping cream (the fluff-maker)
- 1 can sweetened condensed milk (liquid happiness)
- 200g cream cheese, softened (smooth operator)
- ½ cup melted butter (because butter = life)
- 1 tsp vanilla extract (tiny ingredient, big personality)
- ½ cup chocolate chips or chunks (optional but highly recommended)
- Fresh fruits or nuts for topping (look fancy with minimal effort)
Pro tip: Use good-quality cream cheese — it makes a HUGE difference in texture.
Step-by-Step Instructions
1. Make the Base Mix crushed biscuits with melted butter until it looks like wet sand. Press the mixture firmly into a pan or dish. Flatten it using a spoon or glass bottom. Press hard — a loose base equals dessert heartbreak later.
2. Prepare the Creamy Filling In a large bowl, beat cream cheese until smooth and lump-free. Add condensed milk and vanilla extract. Mix until silky and creamy. If it looks fluffy enough to eat already… you’re doing it right.
3. Whip the Cream In a separate bowl, whip the heavy cream until soft peaks form. Don’t overwhip unless you’re trying to accidentally invent butter.
4. Combine Everything Gently fold whipped cream into the cream cheese mixture. Use slow folding motions — don’t aggressively stir or you’ll lose that airy texture.
5. Add Extras Fold in chocolate chips, fruits, or nuts. This is your creative moment. Go wild… but maybe not pickles. Let’s stay reasonable.
6. Assemble the Dessert Spread the filling evenly over the biscuit base. Smooth the top like a dessert perfectionist (or pretend you are).
7. Chill and Relax Refrigerate for at least 4–6 hours, preferably overnight. Yes, waiting is painful. But patience = perfect slices.
Common Mistakes to Avoid
Let’s save you from classic dessert disasters:
- Skipping the chill time. Cutting early turns dessert into soup. Not cute.
- Overmixing whipped cream. You want clouds, not cement.
- Using warm cream cheese. Too soft = runny filling.
- Not pressing the base firmly enough. Crumbly chaos incoming.
- Thinking “measurements don’t matter.” Bold move… usually regretted.
Important: Cold ingredients + gentle mixing = creamy success.
Alternatives & Substitutions
Because kitchens are unpredictable and grocery trips are optional.
- No digestive biscuits? Use Oreos, vanilla cookies, or even leftover cake crumbs.
- Want it lighter? Swap cream cheese with Greek yogurt (IMO, slightly tangier but still delicious).
- Dairy-free? Use coconut cream and vegan cream cheese.
- Not a chocolate fan? Try mango puree, berries, or caramel drizzle.
- Low sugar version? Use sugar-free condensed milk alternatives.
Honestly, no bake desserts are forgiving. They’re basically saying, “Relax, I got you.”
You Should Try Our Best : Keto Dinners Recipe
FAQ (Frequently Asked Questions)
Can I freeze this no bake dessert instead of chilling it?
Yes — but freeze for only 1–2 hours if you want a firmer texture. Longer turns it into ice cream territory (which isn’t terrible, TBH).
How long does it last in the fridge?
About 3–4 days if stored covered. Though realistically, it disappears within 24 hours.
Can I make this ahead of time?
Absolutely! In fact, it tastes better the next day because flavours settle and mingle.
Why is my filling not setting?
Most likely causes: under-whipped cream or not enough chilling time. Give it patience — desserts hate being rushed.
Can I make individual servings?
Yes! Use cups or jars for cute single portions. Bonus: instant Pinterest vibes.
Do I really need cream cheese?
Technically no, but it gives structure and richness. Without it, expect a softer mousse-style dessert.
Final Thoughts
And there you have it — a No Bake Desserts Recipe that proves amazing sweets don’t need complicated steps or fancy equipment. Just mix, chill, and pretend you worked way harder than you actually did.
Cooking should feel fun, not stressful. So experiment, sneak spoonful’s while prepping, and enjoy the process as much as the dessert itself.
Now go impress your family, friends, or honestly just yourself. You made dessert without turning on the oven — that’s already a win. 🍰

No Bake Desserts Recipe
Ingredients
Method
- Mix crushed biscuits with melted butter until evenly combined.
- Press the mixture firmly into a pan to form an even base layer.
- Beat softened cream cheese in a bowl until smooth and creamy.
- Add condensed milk and vanilla extract, then mix until fully combined.
- Whip heavy cream separately until soft peaks form.
- Gently fold whipped cream into the cream cheese mixture.
- Fold in chocolate chips or optional add-ins if desired.
- Spread the filling evenly over the prepared biscuit base.
- Smooth the top and cover the dish.
- Refrigerate for at least 4–6 hours or until fully set.
- Slice, garnish with fruits or nuts, and serve chilled.
Notes
- Use full-fat cream cheese for the creamiest texture.
- Chill overnight for cleaner slices and better flavor.
- Do not overmix after adding whipped cream to keep the dessert light.
- Line the pan with parchment paper for easy removal.
- Store leftovers covered in the refrigerator for up to 4 days.
DID YOU MAKE THIS EASY RECIPE? If you have, then share it with us by sending a photo. We’re excited to see what you’ve made


