
Nutella Oreo Icebox Cake Recipe
So you want dessert… but you don’t want to bake, sweat, or pretend you understand complicated recipes? Same here. That’s exactly where this Nutella Oreo Icebox Cake swoops in like a dessert superhero. No oven. No fancy skills. Just layers of chocolatey happiness that magically turn into a soft, creamy cake while chilling in the fridge.
Honestly, this recipe feels a little illegal because it’s way too easy for how impressive it looks. Friends will think you worked hard. You’ll know the truth. And we’re keeping that secret between us. 😉
Why This Recipe is Awesome
Let’s talk about why this dessert deserves a permanent spot in your life:
- No baking required. Your oven gets a day off.
- Only a handful of ingredients. Because nobody wants a grocery list longer than a novel.
- Beginner-friendly. If you can spread cream and stack cookies, congratulations—you’re qualified.
- Make-ahead magic. Prep today, chill overnight, enjoy tomorrow.
- Crowd favourite. People hear “Nutella + Oreos” and suddenly become your best friend.
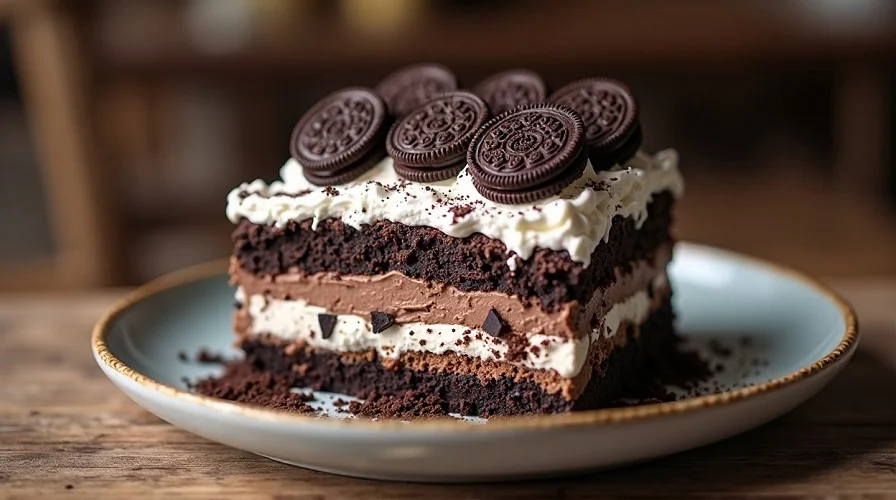
The real magic? The cookies soften in the fridge and transform into cake-like layers. Science? Maybe. Delicious? Absolutely.
And yes, it’s basically impossible to mess up. Even distracted late-night bakers survive this recipe.
Ingredients You’ll Need
Here’s your short and sweet shopping list:
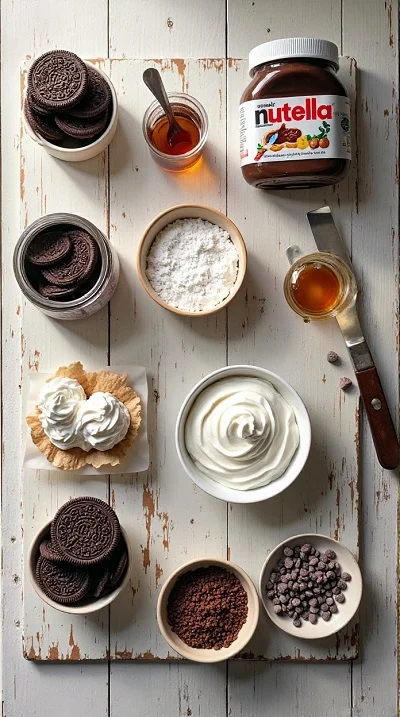
- 2 packs Oreo cookies – the star of the show (don’t eat half before starting… try at least).
- 2 cups heavy whipping cream – for fluffy, cloud-like layers.
- ½ cup Nutella – aka happiness in a jar.
- 3 tbsp powdered sugar – just enough sweetness.
- 1 tsp vanilla extract – small ingredient, big personality.
- Extra crushed Oreos – for topping and dramatic effect.
- Chocolate chips or drizzle (optional) – because extra chocolate never hurts.
Pro tip: Use cold whipping cream. Warm cream refuses to whip properly and will test your patience.
Step-by-Step Instructions
- Whip the Cream Pour cold heavy cream into a large bowl. Add powdered sugar and vanilla extract. Beat until soft peaks form. You want it fluffy, not butter. Stop once it holds its shape—overmixing turns dreams into dairy disasters.
- Add the Nutella Gently fold Nutella into half of the whipped cream. Don’t rush this step; slow folding keeps the mixture airy and smooth. Now you’ve got two layers: plain cream and Nutella cream. Fancy, right?
- Create the First Layer Spread a thin layer of whipped cream on the bottom of your dish. This keeps cookies from sliding around like they’re on ice skates. Lay Oreos in a single layer across the base.
- Add Cream Layers Spread Nutella cream over the cookies evenly. Don’t stress about perfection—rustic looks gourmet anyway. Add another layer of Oreos on top.
- Repeat the Layers Alternate between plain whipped cream, Oreos, and Nutella cream until you run out of ingredients. Finish with a thick cream layer on top because presentation matters (even if you pretend it doesn’t).
- Decorate Like a Dessert Artist Sprinkle crushed Oreos and drizzle chocolate over the top. Go wild or keep it classy—your dessert, your rules.
- Chill (The Hardest Step) Cover and refrigerate for at least 6 hours, preferably overnight. During this time, the cookies soften and turn into cake layers. Patience = perfect texture.
Common Mistakes to Avoid
Let’s save you from dessert heartbreak:
- Skipping chill time. Cutting early gives you cookie stacks instead of cake. Wait. Seriously.
- Using warm cream. It won’t whip properly and you’ll question your life choices.
- Overloading Nutella layers. Sounds impossible, but too much makes layers slide.
- Uneven cookie layers. Gaps create messy slices (still tasty though).
- Overwhipping cream. If it looks grainy, you’ve gone too far.
- Remember: simple recipes still need a little respect.
Alternatives & Substitutions
Want to customize? Go ahead—this cake is flexible.
- Chocolate wafers instead of Oreos: Slightly less sweet but still amazing.
- Chocolate whipped topping instead of homemade cream: Faster option when you’re feeling lazy (IMO, homemade tastes better).
- Peanut butter swirl: Mix some into the Nutella layer for extra richness.
- Coffee flavour: Dip Oreos quickly in coffee for a tiramisu-style twist.
- Low-sugar version: Use sugar-free cookies and reduced-sugar spread.
- FYI: This recipe forgives experimentation. It’s basically dessert therapy.
You Should Try Our Best Deep Fried Nutella Oreos Recipe
FAQ (Frequently Asked Questions)
Can I make this ahead of time?
Absolutely—and you should. It actually tastes better the next day because the layers soften perfectly.
Can I freeze the icebox cake?
Yes! Freeze for a firmer, ice-cream-cake vibe. Just thaw slightly before slicing unless you enjoy wrestling desserts.
Do I really need heavy whipping cream?
Yes. Regular milk won’t whip, and neither will wishful thinking.
Can I use different Oreo flavours?
Of course! Golden Oreos, mint, peanut butter—go wild. Dessert rules are flexible here.
How long does it last in the fridge?
About 3–4 days, covered well. Though honestly, leftovers rarely survive that long.
Why is my cake runny?
Most likely under-whipped cream or not enough chill time. Cold and patience fix almost everything.
Can kids help make this?
Definitely. No oven means safer cooking—and they’ll love stacking cookies like edible LEGO.
Final Thoughts
This Nutella Oreo Icebox Cake Recipe proves you don’t need complicated techniques to create something unforgettable. It’s creamy, chocolatey, ridiculously easy, and honestly feels like cheating at dessert.
Whether you’re making it for guests, family, or a solo Netflix night (no judgment), this cake delivers maximum reward with minimum effort.
So grab those Oreos, whip that cream, and let the fridge do all the hard work. Now go impress someone—or just treat yourself. You’ve earned it. 🍫
Nutella Oreo Icebox Cake Recipe
Ingredients
Method
- Chill a large mixing bowl and beaters in the fridge for 10 minutes.
- Pour cold heavy cream into the chilled bowl, add powdered sugar and vanilla extract, and whip until soft peaks form.
- Gently fold Nutella into half of the whipped cream to create Nutella cream.
- Spread a thin layer of plain whipped cream on the bottom of your dish.
- Arrange a single layer of Oreo cookies on top of the cream.
- Spread a layer of Nutella cream evenly over the cookies.
- Repeat alternating layers of Oreos, plain whipped cream, and Nutella cream until ingredients are used, finishing with a thick cream layer.
- Sprinkle crushed Oreos and drizzle chocolate on top for decoration.
- Cover the dish and refrigerate for at least 6 hours or overnight until the cookies soften.
- Slice and serve chilled.
Notes
DID YOU MAKE THIS EASY RECIPE? If you have, then share it with us by sending a photo. We’re excited to see what you’ve made.


